| Greg's |
 |
| Web Site |
Introduction
 |
This is a collection of tips and web sites that I have learned from other photographers, or figured
by myself, while playing with my pictures and analyzing pictures of others. Feel free to use any advices
given here, but use them carefully and at your own risk. Most of these advices work for me, but don't
blame me if your pictures do not come out exactly like you thought they would. If, however, everything
works out well, or if you just like this site, tell your friends about it.
Well now that we have everything in check, let's move on to the fun part.
Choosing Film
Before you take any picture you need to load your camera with film. A good way to save some money on the film is to buy close to
expiration or just expired film, and freeze it(which prevents deterrioration). Don't forget to let it warm up to room temperature before
loading into camera.
From the manufacturers chose the brand names. If you can afford it and your local photo store carries it, buy Agfa film. I do not
shoot for posters, so I use Kodak Royal Gold and Gold MAX and find the color saturation to my liking. A Gold series film will have better
colors in few very rare cases, but Royal Gold will always be sharper. Gold MAX film is a film with "pushed" grain. It has the sensitivity
of 400 and grain of almost 200 ISO. Fuji makes some good film too, but I am satisfied with Kodak enough not to want to switch to anything
else. I usually buy my film in bulk, which can save a substancial amount of money. Kodak has 4 up to 20 rolls of 200Gold, 400GoldMAX,
100RoyalGold, and 100TMAX.
As far as film speeds, this you need to chose based on your subject. For a slow, set-up shot use the slowest ISO you can find. Kodak
Royal Gold 100 is readily available, and is a "Select Series" professional film, or you can buy a four-pack of regular Gold 100. If you
can find 64 or 50 ISO film, go for it. The resolution and clarity of your portraits will be noticeable on even the 4x6 proof. If you will
have a mixed setting, like an outside party, choose a general purpose film 200 Gold. It fits for most situations and produces good
results.
If you will be shooting in the dark or low light or really fast action like sports or children at play, go with something that
will need less light to expose. A Kodak 400 GoldMAX does a great job for me. Remember that any time you increase film speed, you
automatically lose photo quality. The grain is larger and the resolution is smaller. Kodak "Select Series" offer some high resolution
fast films, and usually a local shop will carry 800, and even 1000 ISO films. I have never had a poorly lit picture on the
400 GoldMAX (not to say that all my pictures were good, and also don't forget that camera's meter has something to do with this too).
Even when the flash doesn't have time to fully recycle and will not go off, 400MAX catches enough information to add contrast and
exposure during development.
Portrait Tips

- Step further away, and zoom in! Longer focal lengthes produce a narrow DOF(depth-of-field)
making the background REALLY blur out.
- Never take a shot straight into the face or with shoulders parallel to the film plane.
Last thing you want to do is make a portrait look flat.
- Take time to compose a shot. Make sure there is more blank space on the side which person is
facing, and a bit of space left on the other side and top too, but not too much.
- When the time comes, take the shot. Great expressions are rare. It is better to have a wrongly
composed shot, than not to have one at all. DO NOT HESITATE!
- Use spot color. Human eyes are often attracted to bright concentrations of color. A yellow
window light on a dark night picture, a red bow in a playing girl's head, or a bright flower among
plain green grass. Use it to attract attention to important features like the face, or to hide
unwanted details like a disturbing background(make it dull, and bring a spot color to the front)
- Take natural shots. Once the shutter has gone off, most people relax, knowing that the
picture taking is over. Take another shot right away! Relaxed look suits most people.
- Same reasoning... Compose your shot, and back off from the viewfinder. Talk to the person. Get
them to laugh, smile, wonder, or think, and take a shot when they are not aware of it by
depressing the shutter. If you are dealing with children, involve them in an activity. Shots of
occupied people look more natural, and almost always better. CAUTION: Many AF cameras will refocus
if the shutter is released and touched again. If you do not have an AF Lock and your object is
off-center, keep your hand on the shutter.
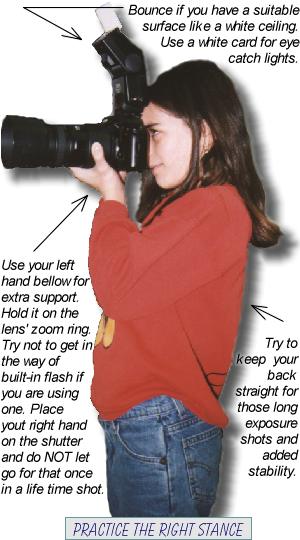
- Use indirect light. Whether you are shooting in a studio or outside for fun, your light must seem ambient and natural.
If you must use a flash - bounce it off a larage bright surface like a white ceiling. If you have an on camera flash that
only fires straight, diffuse it. A piece of used softener paper like Bounce or Bounty(ask your local laundry for a piece if you
can't get it) works well and diffuses quite a bit. If you have a weak flash that needs less diffusion try clear fingernail polish,
a piece of stretched old white stocking, etc. Be creative. I've seen people use a plastic cup as a reflector for a flash. This
will also illiminate harsh shaddows on the walls.
- Use make up when possible. Flashes and sharpness of lenses will pick up many unwanted features on the skin, and
usually(especially in yellow inside lighting) will intensify the rednesses on faces. It's generally a good idea to back off
focus just a bit to take everything slightly blurred. Result? Softer, more diffused and dream like portraits.
Photographing Babies Tips
- While all common sense things apply to babies, much like portrait pictures, there are some special considerations.
First and primary consideration is your baby's health. Babies are much more sensitive to things that seem normal to us.
Warm room temperature is a must! No direct light onto eye retinas. Sight damage, temporary or even permanent
loss may occur. NO PICTURE IS WORTH A LIFE OR WELLFARE OF A CHILD!
- Use soft light. While the sunlight can create some interesting light patterns, the real interest of the baby pictures
is the "baby soft" effect. Use even soft light from a bounced flash, umbrella, or a reflector. Pay extra attention to lighting
the eyes. Use a concentrated light source("snoot") across the eyes to add more light if necessary. Do not shine it straight on.
- Use humor, if possible. The age of formal baby pictures is ending. Candid and humoristic shots take more preference.
Use a wide angle lens to alter the perspective and emphasize the face. Make sure the baby is smiling and has an
interest in you(looking at the lens or close to it). Try photographing with a wide variety of lenses though. 50/1.4, 80/2.8,
105/2.8, 135/2.8, 200/4, 300/4. Of course these are, for the most part, expensive lenses. You can easily go by with a
28-105/2.8-4, 70-200/2.8, 80-200/2.8, 70-300/4-5.6.
- Use wider apertures. What a better way to emphasize the fine detail in the baby's face, than to remove and blur not only
the background, but even the further parts of the baby.
- Shoot natural poses. No 3-month old is going to sit and pose for you. They sleep - let them, take a picture anyway. Don't
use a flash though. They cry - take a picture. They are on the stomach - click that shutter release. On the back? You know what
to do. One of my favorite pictures was a wide angle picture of a baby, REALLY interested in a butterfly. The buttefly was on the
left of the frame, and the baby in shear amazement with a huge smile on the face was lying on the stomach on the right of the
picture and staring at the butterfly. The wide angle really underlined the size of the butterfly and the face. But that was a
winner at some competition. Why can't your picture be the next winner?
- Use the rule of thirds. Most baby shots include a lot of detail, so the main subject should be at the "interest point".
Don't place your baby in the center. Instead, in your mind, cut the pucture in 9 parts like a tic-tac-toe board, and place your
baby(baby's face) into one of the intersections of the board.
- Though you should use better film whenever possible, with babies do NOT use any film past ISO 200. The grain of the film
will make baby's skin unnaturally rough, and send your "baby soft" to hell. Make sure your film is designed for better skin tones.
Fuji Astia slide film is primarily warm toned for very good skin results. Kodak Portra 160NC is a VERY good color negative film.
- Best light pattern is natural light, with a heavily diffused fill flash and one or two reflectors(use one or both gold reflectors
for warmer tones). The "snoot" device is optional, but often unnecessary.
Landscape Tips
- Use a tripod! You can never go wrong with it. Most important things about landscapes are color and clarity.
Using a tripod makes your camera steady and pictures sharp. If you need extra ballance, hang a camera bag under the tripod.
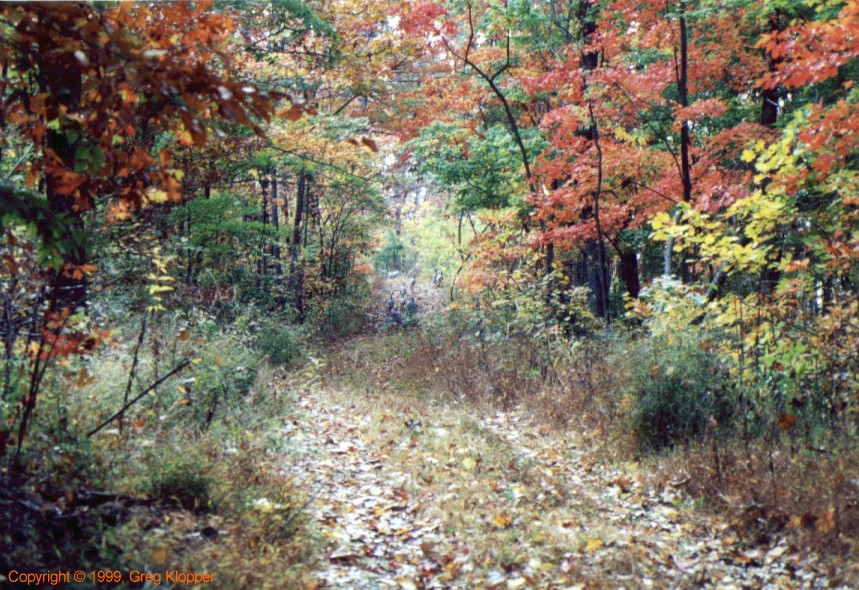
- Make sure you have 3 focusing areas in a shot. You need a light, with predominantly blue tones, background, a colorful and
descriptive middle(filling), and finaly the closer object(distraction). For example in this picture wild turkeys and the light,
shining through the trees, serve as the background. Bright trees on the right set a filling, and sharper road up front and dried
leaves on the left create the necessary distraction for a feeling of perspective.
- Pay attention to your DOF. If you shoot nature and landscapes, you'd like to have every intricate detail in your picture.
Set a larger apperture. It's hard to go wrong past f/9.5 or f/11. On the other hand if you have an animal or a human in the
front, people will always look at those objects first, and sharp surroundings WILL distract them. Set an aperture that will
show your main subject but won't blur the background to a clear color. f/4 or f/5.6 will do the trick.
- Follow a pattern. If you take a photograph of a horizon or tree tops, make the imaginary line parallel or perpendicular to
another subject in the picture. If it's a fallen tree, choose an angle that will best show it's fallen position. Make it stand
out in your pictures by making it the only object under that angle.
- Do not underestimate the importance of filters. Two filters that are a must are a polarizer for contrast and bluer
skies, and a UV filter for better tones. Use both in a combination if you want, but remember that a filter is another
optical object between the picture and the film (lens is one), so more filters you use the worse is the sharpness. It will not
matter for anything up to 8x10 print though. Use better filters if in doubt. Cokin and Tiffen are among most popular.
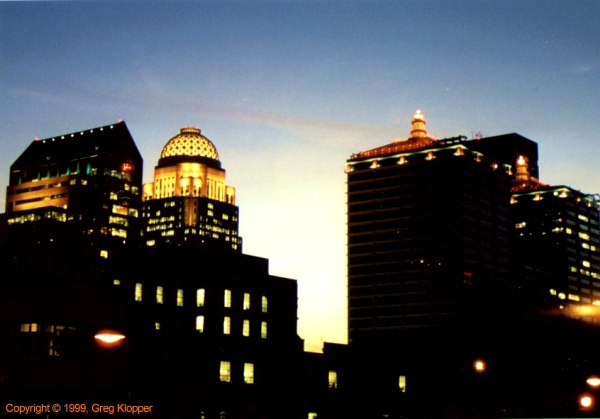
- If shooting a sunset, remember that you are shooting for the details and colors of the sky and clouds. That's really what
makes those sunset pictures so attractive. Meter off of the brightest subject in the scene - sun or it's setting point. Use
spot metering if you have it, and then use the metered value for the entire scene. Most importantly, it is VERY rare that you see
the same beautiful sunset twice, so bracket, bracket, and bracket again. Also keep in mind that during the sunset, what
you see is going to stay the same for no longer than 10 minutes. Do not waste time, if you see it - shoot it.
- If you can take a better picture by ignoring one or all of these tips - ignore them. Refer to the front page for the only 3
rules of photography.
Vacations and Architecture Tips

- Best advice anyone can give you is take MORE pictures. Different angles, different exposures,
different times of day. You name it. Pictures can come out wrong, an important detail may be missing,
or, frankly, you will want to remember something that you didn't take a picture of.
- If shooting in the evening, use a tripod or some support for camera whenever possible. Any exposure
of 1/30 or shorter is a subject to [substantial] blur from your hand movement. If you are taking a picture
from a window, push the camera lens or hood against the glass. CAUTION: Most AF lenses have front element
focusing. Focus first, then push the lens against the glass to take a picture.
- Do not let the rain stop you from taking pictures. Pictures taken when the weather changes look best.
Use an umbrella, clamped to a tripod, or have someone hold it, just make sure it doesn't cover the flash
or lense range. In bad weather look for reflections in the water, ray of light shining through the
clouds, or human emotions(a child running in the rain, an old upset woman with an umbrella). You will get
enough soft ambient light from the clouds. Use flash sparingly only as a very underexposed fill.
- If you will use an airport, pack your film in a transparent plastic bag if possible, and keep it in stacks of
20 rolls or so. You may be asked to have it inspected. You do have a right for a hand inspection,
ask for it. X-RAYS CAN DAMAGE YOUR FILM!
- On vacations, your surroundings are an important part of your trip. Photograph your hotel, outside pool,
anything that catches eye like an interesting tree or an old antiques shop on the corner. Take pictures
different times of day, say when you hotel is lit with orange colors of the setting sun. If your pictures
include ground or road, try to include people into the pictures. Even if they are not related to you,
they will make your picture seem more alive.
- If you are taking a picture of people, let them do what they do: sunbathing, swimming, or talking on the phone.
Make sure to catch their faces. No one knows that it's your daughter who just made that wonderful jump
from a high board if you shoot her back.
- When taking a picture of a building, make sure to avoid flatness. Include two sides by shooting from
a corner, or include an object closer to the camera, to provide for distance and perspective feeling.
Links
Newsgroup Letter that I sent to answer a novice photographer's question. I don't claim to
know it all, but I think a lot of the things I value knowing and spent much time to find are in that letter.
Kodak has some great tutorials for amateurs and pros alike.
Find out what those different names of film and ISO speeds mean, and how to use them effectively.
Agfa
has a very interesting, and rather helpful set of tips on their web site, that covers everything from
bad weather photography to studio portraiture and more. Highly recommended for beginners.
Moose Peterson's Web Site is like a golden mine
for any photographer - amateur and pro alike. Moose specializes in wildlife, and wrote many books on
the subject as well as equipment reviews and some of the well known "Magic Lantern" series books. His Web
Site contains information on how to understand and use your flash better, camera reviews and tricks, and
some outstanding photography.
World Photo Gallery, this is a great site.
One of the few places on the internet to show your work and get comments and advices. Some useful and professional
tips. Many photographers from all over the world.
Photo Critique, like World Photo Gallery,
is a place on the internet to demo your pictures and get comments advices and critique. A lot of informative
info and many useful tips too. Links to other useful Sites
Photoshopper Forum is a great
place to look for answers to your simplest and most complicated questions. Everything from general 35mm
photography to specific types of photography, darkrooms, and lighting. If they can't answer your
question, you don't know what you are talking about. And even then they'll try to answer it.
Ebay Auction is perhaps my
most important tip for you. You can find nearly everything there, and the bargains are unbelievable. A
$60 tripod for only $10 or a $250 lens for $175. I like my money right where it is - in my
pocket.
Tamron has some good tips for every
beginner and those who do not concern themselves with technical photography, just take pictures as
memories for a photo alboum.
The Camera Shop has some
good advices for unusual situations as well as some important pointers. Look them up.
Hyperzine offers some very useful
tips for what to look for in a photograph or a composition, and how to make a better picture.
Well... Enough for now. Browse around on the Internet if you want more tips pages. In my humble opinion
the only way to better pictures is taking them. The more you pictures take - the better you become.
As I have more time and learn more I will post more tips for your viewing pleasure.

Please try this site. They pay you $.50 for every hour on the web up to $20/month,
and then for $.10/hr all people you refer and $.05 for all people they refer upto 4 levels.
You can make thousands if you refer enough people.


Copyright © 1999, Greg Klopper.
All material on this site, including text, images, and designs, is private domain and must not be copied, modified, or duplicated without special permission from the owner.